Friday, May 12, 2017

MP4 to iTunes: How to Import MP4 to iTunes on Mac/Win

Though iTunes announced to support MP4 video file, we often meet difficulty in adding MP4 to iTunes or in syncing MP4 files from iTunes to iPod, iPad, iPhone, Apple TV. The following article just aims to solve how to successfully import iTunes unsupported MP4 to iTunes so as to play MP4 in iTunes or sync MP4 to iPhone, iPad, iPod, Apple TV.


iTunes can handle just about any file format that works with QuickTime and will play any file purchased or downloaded from the iTunes Store. If you've got video files that end with a .mov, .m4v, or .mp4 file extension, you can import them to iTunes with ease. However, the video especially the MP4 video must meet the following specifications: it must be encoded as 540 kbit/s (minimum) MPEG-4 video (H.264) with an approximately 128 kbit/s AAC audio track or encoded as 1.5 Mbit/s (minimum) MPEG-4 video (H.264) with a minimum 128 kbit/s AAC audio track. If not, you will fail to import MP4 to iTunes.

Even if your MP4 files meet the above specifications like the encoder, bit rate, resolution, etc. and are added to iTunes successfully, it may still fail to sync to iOS devices because of incompatibility problem. For iPhones, iPads, and video-capable iPods play videos in more specific video formats and codecs. The solution to this common problem is to convert the MP4 video files to iTunes, because only a few audio/video formats are supported by iTunes. Converting your files to iTunes supported format will allow you to play your MP4 videos smoothly.

To do this conversion, an intuitive program like the Dimo Video Converter Ultimate for Mac will be of great help. This tool can convert your MP4 videos to iTunes supported M4V, MOV without compressing the video quality. In addition, you can use this tool to make adjustments to the videos easily using a built-in editor. The Mac equivalence of MP4 to iTunes Converter is Dimo Video Converter Ultimate, which is well compatible with Windows 10. Read on and follow the step-by-step guidance below to convert MP4 videos to play on iTunes now.

Free Download Dimo Video Converter Ultimate for Mac/Win:


Other Download: 

Convert MP4 movies to iTunes (iTunes 12) on macos Sierra

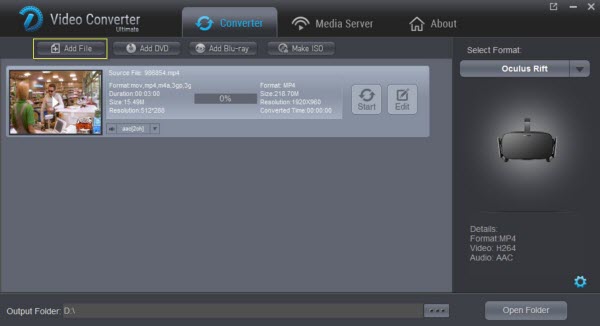
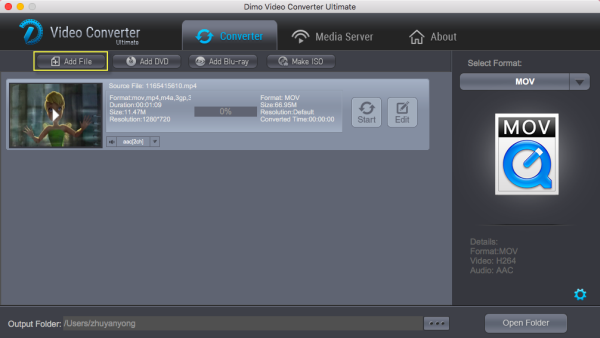
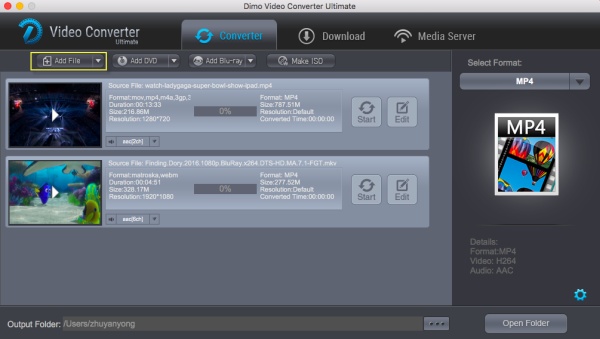
Step 1. Just install the program, then head to the folder where the MOV files are stored. Add the files to MP4 video converter by clicking "Add File" or directly drag & drop. 


Step 2. Click "Select Format" bar to open the output format window. In the "Format > Video" category, you'll find iTunes supported MP4, MOV, M4V format, just choose it as the output format. To enable these files fully compatible with iTunes, manual settings are required.

Tips: 

1. If you import MP4 to iTunes for syncing to your iPhone, iPod or iPad for play back, you can directly choose the iPhone/iPod/iPad preset. In this case, no manual settings required.

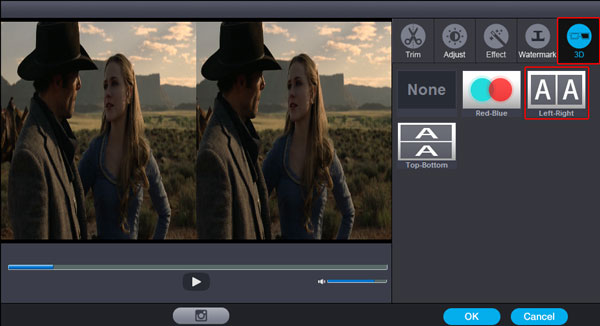
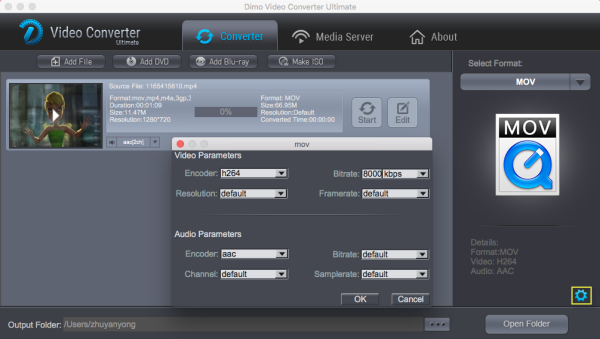
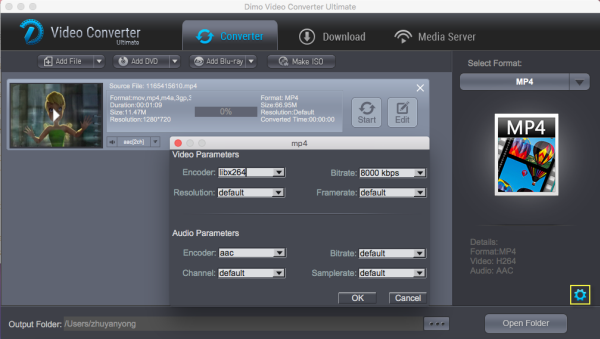
2. You are able to set the parameters for your files by clicking on Settings button, such as video and audio codec, video size, bit rate, frame rate, audio channel and so on. You can compress your MP4 for playback smoothly before conversion.


Step 3. Once you have all the right settings, you would click the "Start" button to complete the MP4 to iTunes conversion process. After conversion, click Open to find the output iTunes videos. Now it would be easy to transfer the converted videos into your iTunes library and even sync to Apple devices.

Additional Tip: For new iTunes 12, there's little difference with the previous version. You can learn how to add videos to iTunes 12 in detail.

1. Start iTunes 12.
2. Click File > Add File to Library.
3. Click View and select Movies, then your movie library will be presented.
4. Click Home Videos and now you can find your transferred videos. In this interface, you can also directly drag and drop local video files.

Free Download or Purchase Dimo Video Converter Ultimate for Mac/Win:


Need the lifetime version to work on 2-4 Macs so that your friends and family can instantly broaden their entertainment options? Please refer to the family license here


Kindly Note:

The price of Dimo Video Converter Ultimate for Mac is divided into 1 Year Subscription, Lifetime/Family/Business License: $43.95/Year; $45.95/lifetime license; $95.95/family license(2-4 Macs); $189.95/business pack(5-8 Macs). Get your needed one at purchase page.

Related Software:

BDmate (Mac/Win)

Lossless backup Blu-ray to MKV with all audio and subtitle tracks; Rip Blu-ray to multi-track MP4; Convert Blu-ray to almost all popular video/audio formats and devices; Copy Blu-ray to ISO/M2TS; Share digitized Blu-ray wirelessly.

DVDmate (Mac/Win)

A professional DVD ripping and editing tool with strong ability to remove DVD protection, transcode DVD to any video and audio format, and edit DVD to create personal movie.

Videomate (Mac/Win)

An all-around video converter software program that enables you to convert various video and audio files to formats that are supported by most multimedia devices.

8K Player (Mac/Win)

A mixture of free HD/4K video player, music player, Blu-ray/DVD player, video recorder and gif maker. 

Contact us or leave a message at Facebook if you have any issues.

Related Articles:

Monday, May 8, 2017

Make 3D Videos and Movies for Oculus Rift

Fanciful to create 3D movies for playing on Oculus Rift? Certainly not. Maybe it has been imagined before, but in the prevailing Virtual Reality times, making 3D VR videos yourselves come true even you thought you are just an amateur. There are a few tricks required to be able to watch your own movie library on Oculus Rift, as well as convert incompatible videos for Oculus Rift in 3D. Read on.


How to create 3D MP4/MKV videos for Oculus Rift? 

To watch your own 2D/3D movies and even 360 degree videos on Oculus Rift with 3D effect, you can download a free VR player app like Virtual Desktop, which allows you to enjoy your movies in correct video mode. Just browser the videos and put on your Rift to enjoy.  

Why not play good movie sources with built-in Oculus Video App?

If you have an Oculus Rift, you have probably noticed the built in Video App. The Oculus App has several limitations which include:

* Inability to detect automatically 360-degree movies stored on your computer. Workaround: Rename any 360-degree movie you have so the filename ending with  _360, then the player will pick up the file for playback in 360 degrees.

* The player will play regular video files such as .MKV in a virtual movie theater, which is cool, but it will not play 3D movies or play any sound if the audio is encoded in DD5.1, DTS or any surround sound format

You may tired of the hundreds of simple trailers, demos and some shorts from online on Rift with 3rd party VR players. In these cases, you do the favor to seek the chance to see spectacular local films in Blu-ray, DVD, AVI, MKV, MTS, MXF, YouTube FLV, YIFY, etc. within Oculus Rift, can be done? 

So as to finish the task, you can adopt 3D movie creating software of Dimo Video Converter Ultimate for help. With it you can easily convert 2D/3D movies or rip Blu-ray/DVDs to MKV, MP4, AVI WMV with 3D effect to create true theater entertainment. 

If you have the colorful 3D glasses and 3D player on PC like Stereoscopic Player or 3D TV, it couldn't be more wonderful to create 3D Red-Green movies for them. If you're Mac users, then turn to Dimo Video Converter Ultimate for Mac, which allows you to create 3D videos for playback on Oculus Rift on Mac(including OS Sierra and OS X El Capitan). Now download the right version and follow the tips below to finish your job. 

Free Download Dimo Video Converter Ultimate (Win/Mac):


Other Download: 
Steps to Make 3D movies for playing on Oculus Rift

Step 1. Add own movie library

Install and launch the best 3D Converter for Oculus Rift, and add video files by clicking "Add file" or using "Drag & drop" method 


Step 2. Choose SBS 3D MP4/MKV as output format for Oculus Rift 

To watch mvoies on Oculus Rift with 3D effects, you can choose an Oculus Rift customized profile with its supported format

Go to the "Select Format" >"Device" >"VR" >"Oculus Rift" 

Step 3. Set Side-by-Side(SBS) for Oculus Rift VR 

Click "Edit" >"3D" >"left-right" >"OK". What's more, you can also use the useful build-in video editor in this Video Converter Ultimate to polish your video to get a better 3D visual entertainment. 


Note: Although there is a profile created by the application, if you like you can always change some parameters of resolution, compression, audio, etc to get your favor output 3D movies. 

An important issue that you must consider that in Oculus Rift VR resolution for each eye is not Full HD as the headset uses two separate OLED displays that receive their visual information from very powerful PCs running some of the world's best graphics cards. So you can free change your target video size, bitrate, frame rate in "Settings". Here, 720p (1280*720) with a higher bitrate around 5mbit/s is recommended. Higher resolutions for the specific format doesn't make the quality better but are a waste of power and battery life.

Step 4. Start to convert 2D/3D videos to SBS 3D MKV/MP4 for Oculus Rift 

At last, simply click the "Start" button, and the 3D SBS maker will start the conversion for playback with Oculus Rift. After conversion,  head to the destination folder where the converted files are stored (under "Open" button). After that, transfer them to Oculus Rift headset for playing.

How to Watch Movies On The Oculus Rift (Development Kit 2 DK2)? 

Here we go:

Step 1: Properly labeling your 360 and 3D videos
Before you can move your 360 and 3D videos to the Videos folder in your Windows system drive, it must be labeled in the proper format for Oculus to render it correctly.

Label 3D videos:

For 3D panoramic videos, top-bottom, bottom-top, left-right and right-left stereoscopic video support are implemented using the following naming convention:

Naming conventions used to label your 3D panoramic video:

"_TB.mp4" or "_360_TB.mp4" - Top / bottom 3D
"_BT.mp4" or "_360_BT.mp4" - Bottom / top 3D
"_LR.mp4" or "_360_LR.mp4" - Left / right side by side 3D
"_RL.mp4" or "_360_RL.mp4" - Right / left side by side 3D

Please add the proper naming convention to the end of your video file name.

Example: If your video file was MyCoolVideo.mp4, label it asMyCoolVideo_360_TB.mp4.

Label 360 videos:

360 videos in Oculus are implemented using spherical mapping to render panoramic videos. For your 360 video to be compatible with Oculus, add "_360" to the end of your file name. Example: If your video file was MyCoolVideo.mp4, label it as MyCoolVideo_360.mp4.

Step 2: Transfer your videos to Oculus Video

The Oculus Video app for Rift pulls video files from your default Windows video folder. To transfer your video files to the Windows Video folder:

Open your Windows System drive (this is generally your C: drive).
Open the Users folder.
Select your user profile.
Locate and open the Videos folder and move your videos here.

The next time you launch Oculus Video, your videos will automatically appear in the "My Videos" section.

How awesome is this? Yeah, it is that good! And then you can enjoy 3D movies on Oculus Rift (DK2) easily. With the innovative GUI, Dimo Video Converter Ultimate, the powerful software to create 3D movies for VR, has stepped into a whole new level of 3D performance and portability for VR videos. Wherever your ideas take you, you'll get there more than ever with adding 3D effects to own movie library, high-performance 3D Blu-ray/DVD ripping/handling based on 6X faster NVIDIA CUDA speed-up technology, state-of-the-art output VR presets like Oculus Rift,  Samsung Gear VR, HTC Vive, etc., and more. 

Free Download or Purchase Dimo Video Converter Ultimate:


Need the lifetime version to work on 2-4 PCs so that your friends and family can instantly broaden their entertainment options? Please refer to the family license here


Kindly Note:

The price of Dimo Video Converter Ultimate for Windows is divided into 1 Year Subscription, Lifetime/Family/Business License: $43.95/Year; $45.95/lifetime license; $95.95/family license(2-4 PCs); $189.95/business pack(5-8 PCs). Get your needed one at purchase page.

Related Software:

BDmate (Win/Mac)

Lossless backup Blu-ray to MKV with all audio and subtitle tracks; Rip Blu-ray to multi-track MP4; ConvertBlu-ray to almost all popular video/audio formats and devices; Copy Blu-ray to ISO/M2TS; Share digitized Blu-ray wirelessly.

DVDmate (Win/Mac)

A professional DVD ripping and editing tool with strong ability to remove DVD protection, transcode DVD to any video and audio format, and edit DVD to create personal movie.

Videomate (Win/Mac)

An all-around video converter software program that enables you to convert various video and audio files to formats that are supported by most multimedia devices.

8K Player (Win/Mac)

A mixture of free HD/4K video player, music player, Blu-ray/DVD player, video recorder and gif maker. 

Contact us or leave a message at Facebook if you have any issues.

Related Articles:

Wednesday, May 3, 2017

Tricks Importing MP4 to PlayStation 4 Smoothly

Although the official site has announced Sony PlayStation 4 can support MP4 files, you still find some MP4 files fail to play on the device. That's because it only supports an MP4 file with the video codec of MPEG-4 AVC H.264 and MPEG-4. However, different MP4 files tends to have different video codecs and the codecs which might not be compatible with the console. To play those incompatible MP4 files on PS4, the easy solution is to convert MP4 to PS4's supported formats, and then transfer the converted files via USB.


To finish the task, you can adopt Dimo Video Converter Ultimate. It can help you convert MP4 into the supported formats of PS4. Other format videos like MKV, VOB, FLV, MOV, F4V, MXF, AVCHD, MTS, ASF, etc. can also be converted with Dimo.

Get the Best MP4 to PS4 Video Converter:

* Fast Conversion with best quality: Flawless conversion of media files with best quality standards within seconds.

*  Library of Presets: Flexible & category-wise profiles allows you to switch media files from one file format into another with more than 150 presets including PS4 Pro, PS4, PS3, Xbox 360, Xbox One, Xbox One S.

* Offers Core Editing TOOLS: It is equipped with advanced video editing function like extracting audio, cropping video, splitting video, trimming, adjust effects, add watermarks/effects, change bit rate or frame rate etc.

*  Export local movies via wifi: One-click to share Videos from computer to iPhone, iPad, Android, TV, etc wirelessly.

* Make ISO files: Turn video folder or Blu-ray to ISO files for backup or playing freely

*  Compatible Windows 10/8.1/8/7/XP/Vista, as well as macOS 10.12 Sierra, 10.11 El Capitan, 10.10 Yosemite, 10.9 Mavericks, 10.8 Mountain Lion and 10.7 Lion, etc.

For Mac users, Dimo Video Converter Ultimate Mac is also a helpful app to encode MP4 videos to PS4 on Mac for further usage. Just get the right version according to your computer's OS and follow the step-by-step guide below to convert MP4 files to PS4 smoothly.


Free Download Dimo Video Converter Ultimate (Win/Mac):


Other Download: 
How to convert and stream MP4 to PS4

Step 1. Load MP4 files

First, run this smart MP4 to PS4 video converter and then import your local MP4 files by either clicking "Add file" button in the top-left corner of the interface or drag-and-drop the MP4 files you want from your local directory. It's illustrated in the screenshot below.


Step 2. Select output format

Now click the "Select Format" icon to reveal output panel, then move mouse cursor to "Device > Game" category to Select PS4 as the output format. PS4 won't play MP4 sometimes or there is only video or audio when people play MP4 files in PS4. Why? That's because PS4 only supports this kind of MP4:

- Visual: H.264/MPEG-4 AVC High Profile Level4.2
- Audio: AAC LC, AC-3 (Dolby Digital)

Tip: By clicking the Settings icon, you can adjust video and audio parameters like codec, bit rate, frame rate, sample rate, etc., in that way, you can take charge of the size and quality of the output files. In principle, the larger input values, the better output quality, but the corresponding larger file size.


Step 3. Start converting MP4 to PS4

At this point, you can change the output filename or output path if you wish. If you feel satisfied with your options, Just hit the "Start" button to activate MP4 file to PS4 conversion. When all conversions completed, you'll get a pop-up notice. Just click "Open", you can fast find where your converted files are saved. Now you can transfer incompatible MP4 files on PS4 via streaming or the help of a USB storage and enjoy them without any hassles.

How to Transfer videos to PS4 Via USB

First, insert a USB drive into your computer, copy the converted MP4 onto it.

Second, insert the USB drive into USB port of PS4, then go to the main menu, select "Video" and find your USB Drive, select "Display All" to show the video files on the USB drive. Please choose the file that you want to transfer and press the triangle button, choose "Copy" and confirm, the movie will be transferred to your PS4 hard drive, then you can play it.

P.S.

Sony PS4 is equipped with 4K resolution, eight-core X86 AMD Jaguar CPU, 8GB of GDDR5 memory, built-in 500GB hard disk drive, read only Blu-ray drive and even video streaming function, you can get better enjoyment with the improvement of hardware.

Though the truth that the PS4 will not be able to play 4K Blu-ray movies which may disappoint you, you can still take advantage of Video Converter Ultimate to convert videos and movies you like to play on PS4.

Other possible solutions for PS4 MP4 Playback issues:

1. Make sure your USB storage devices are in FAT and exFAT formats. PS4 doesn't recognize NTFS which means you can't play videos larger than 4GB. So reduce video size or split videos if need be, meanwhile, you have to convert NTFS to FAT32 or exFAT.

2. Create a folder and place all your videos into it when using a USB storage device so that your PS4 system can recognize and read them, otherwise you won't see anything. No specific folder name required for videos, but audio needs to be in a folder named "Music".

Free Download or Purchase Dimo Video Converter Ultimate:


Need the lifetime version to work on 2-4 PCs so that your friends and family can instantly broaden their entertainment options? Please refer to the family license here


Kindly Note:

The price of Dimo Video Converter Ultimate for Windows is divided into 1 Year Subscription, Lifetime/Family/Business License: $43.95/Year; $45.95/lifetime license; $95.95/family license(2-4 PCs); $189.95/business pack(5-8 PCs). Get your needed one at purchase page.

Related Software:

BDmate (Win/Mac)

Lossless backup Blu-ray to MKV with all audio and subtitle tracks; Rip Blu-ray to multi-track MP4; ConvertBlu-ray to almost all popular video/audio formats and devices; Copy Blu-ray to ISO/M2TS; Share digitized Blu-ray wirelessly.

DVDmate (Win/Mac)

A professional DVD ripping and editing tool with strong ability to remove DVD protection, transcode DVD to any video and audio format, and edit DVD to create personal movie.

Videomate (Win/Mac)

An all-around video converter software program that enables you to convert various video and audio files to formats that are supported by most multimedia devices.

8K Player (Win/Mac)

A mixture of free HD/4K video player, music player, Blu-ray/DVD player, video recorder and gif maker. 

Related Articles:

Monday, May 1, 2017

Play MKV Movie files More smoothly on Mac OS Sierra


MKV format is a very popular video format that is supported by the majority of media players. But Mac's MKV support is not that good and many Mac users may suffer stuttering playback when watching MKV with preinstalled QuickTime, especially after upgrading macOS 10.12 Sierra. This article will share two easy methods to play MKV on MacOS Sierra, so that you can have a smooth MKV playback on MacOS with ease.


Method 1. Play MKV on macOS Sierra with QuickTime Component [No 100% work guarantee]

Perian is a open-source software app that makes viewing your media files easier. Basically, Perian enables QuickTime application support for a wide variety of media files. It installs easily as long as you have no software already installed that can conflict with Perian. So, before installing Perian, you need to remove all QuickTime Components installed on your Mac, like FFusion, Xvid Delegate, 3ivX, DivX, DivX Decoder, XviD, msmpeg4v1, msmpeg4v2, AviImporter, EX_M4S2, Casio AVI Importer, AC3 Codec, and MatroskaQT. 


Bottom Line: Perian does not work with QuickTime 10 or above, and the development team for Perian will cease updates in the near future to move to another project. Still, if you use earlier versions of QuickTime 7 and run into file format issues (especially on migrated files), then Perian is a must-have. Its support for a huge number of file formats makes this a useful utility for most people. 

Plus, the latest version 1.2.3 of Perian doesn't work on Mac OS X Mavericks, Yosemite, El Capitan and the latest macOS Sierra because Perian requires installation of Quicktime 7, which doesn't exist for Mavericks and above. 

Method 2. You can try other MKV Players for Mac [Not always work]

1. VLC Player 

This app is a popular Mac MKV Player. Beware though that the quality of MKV playback with VLC player certainly needs an improvement, and the app itself consumes quite a bit of CPU memory. 


2. UMPlayer 

Universal Media Player (UMPlayer) like VLC is an open-source media player which has inbuilt codecs to play .mkv, .avi and can play .webm video on Mac OS. 


3. MPlayerX 

In comparison to the VLC media player, MPlayerX is not that popular. However, it is still one of the most widely used video players among the Mac users. It plays most of the popular file formats including the MPEG, VOB, AVI, ASF, WMA, WMV, VIVO, QT, MOV, MP4, OGG, OGM, RealMedia, Matroska, NUT, NuppelVideo and much more.  


Bottom Line: If you want to play MKV on QuickTime and run macOS Sierra, El Capitan, Yosemite, Mavericks, not all players will work perfectly, for example, the video is too dark, choppy; the video and audio can not sync; some subtitles can not be played; some DVD or other video file can not be played; some free player crashes.

Worse still, players like VLC can play lots of video formats, like MP4, AVI, MKV, AVI, WMV, etc, but not all of them, like AAF, DAT, MXF, etc. 

Method 3. Convert MKV videos to macOS Sierra supported formats [Recommend]

So to avoid MKV players related problems and to save time in looking for third-party QuickTime components, the alternative method here is to convert the MKV video format to the macOS Sierra QuickTime supported video format, such as MOV.   

Although there are some free video converter, like VisualHub, Handbrake, etc., to convert MKV videos, they are usually hard to use and only support limited formats. For an easy to use MKV video converter, Dimo Video Converter Ultimate for Mac deserves you try. It can do the MKV file conversion like a charm, without any hassle and supports the latest macOS Sierra and Windows 10. What makes it excels is that It provides you with the optimized output video settings for iPad, iPhone, Apple TV and many mobile phones. One click to convert MKV to be iDevice compatible. 

See Its Essential Features:

* Convert MKV  to macOS Sierra supported formats like MOV and MP4 with both rather fast speed and original quality
* Extract audio files from MKV videos as MP3, WAV, WMA, AC3, AAC, etc.
* Except from converting MKV video, this tool supports the conversion of more than 70 popular video formats AVI, WMV, FLV, MPEG, VOB, TiVo on macOS Sierra
* Make ISO from MKV videos for backup or playback if necessary.
* Trim, crop, rotate or add effects/subtitles/watermarks to your MKV videos before converting them.
* Compatible with macOS 10.6 or later, including 10.12 Sierra and 10.11 El Capitan, Windows 10/8/7/XP/Vista.

Below is the step-by-step guide that shows you how to encode MKV files to macOS Sierra compatible videos (Windows version is here). 

Free Download Dimo Video Converter Ultimate for Mac/Win:


Other Download: 
1. Import MKV videos

Launch the MKV Converter for macOS Sierra. You can directly drag local MKV videos into the program window or click "Add File" button in the bottom left to import MKV files.


2. Choose macOS Sierra friendly format

Click "Select Format" bar and select "MOV" or "MP4" from the "Format > Video" or "Format > HD Video", which are fully compatible with macOS Sierra and Quick Time.  

P.S. This Video Converter for macOS Sierra also helps you to convert videos to mobile devices/VR/TV/Editors/Game Cosole supported formats.

3. Start converting MKV on macOS Sierra

In the end, you just need to click the "Start" button start the MKV conversion on macOS Sierra. When the converting process ends, you can open output folder to check and play converted MKV videos on your macOS Sierra. It would be easy for you to enjoy the converted MKV with Quick Time or iTunes with original quality.

[Note] Advanced Features for Expert Users: 

* A "Setting" icon means you can utilize it to better adjust your output video parameter settings, such as improve the video resolution to 1080p or 4K UHD; change frame rate from 24fps to 30 or 60 fps; turn up video Bit rate from 2500 to 2800kbps or even higher, etc.


* If your MKV video file is mixed with the annoying commercials which degrade your video quality or lead to your MKV video playback failure, you can click "Edit" edit MKV video like cut off the commercials from MKV video to further compress MKV video with no charge of quality; crop the unwanted black bars from video image, add text watermark to MKV, add effect to individulize MKV video, etc. 

* Pay attention to the "Media Server" server, whose function is to let you free share local movies or converted videos to mobile devices or TV wirelessly. 

Free Download or Purchase Dimo Video Converter Ultimate for Mac/Win:


Need the lifetime version to work on 2-4 Macs so that your friends and family can instantly broaden their entertainment options? Please refer to the family license here


Kindly Note:

The price of Dimo Video Converter Ultimate for Mac is divided into 1 Year Subscription, Lifetime/Family/Business License: $43.95/Year; $45.95/lifetime license; $95.95/family license(2-4 Macs); $189.95/business pack(5-8 Macs). Get your needed one at purchase page.

Related Software:

BDmate (Mac/Win)

Lossless backup Blu-ray to MKV with all audio and subtitle tracks; Rip Blu-ray to multi-track MP4; Convert Blu-ray to almost all popular video/audio formats and devices; Copy Blu-ray to ISO/M2TS; Share digitized Blu-ray wirelessly.

DVDmate (Mac/Win)

A professional DVD ripping and editing tool with strong ability to remove DVD protection, transcode DVD to any video and audio format, and edit DVD to create personal movie.

Videomate (Mac/Win)

An all-around video converter software program that enables you to convert various video and audio files to formats that are supported by most multimedia devices.

8K Player (Mac/Win)

A mixture of free HD/4K video player, music player, Blu-ray/DVD player, video recorder and gif maker. 

Related Articles: